
Hello and welcome to the March Creative Challenge with My Favorite Things! This month we are creating with stencils and sharing fun ways to use them. I love that you can use them in a variety of ways and they're affordable! And there are so many great designs to choose from!
For my first card I decided to create a circle card with a stenciled design on the front. I first did my stenciling by adhering the Jumbled Letters stencil onto a piece of white cardstock. I then used Sno Cone ink and an ink blending tool to add the colour. I went darker around the edges and added it lighter as I went into the center.
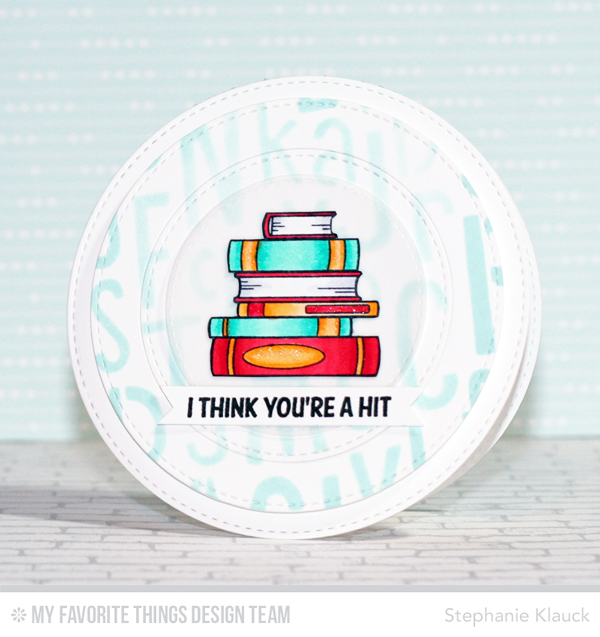
Since I concentrated the colour around the outside, the colour fades into the center and draws the eye in to the focal image, which is the stack of books from the Class Act stamp set. I coloured them with Copic markers and added a bit of shimmer with a clear glitter marker.

I originally planned to adhere the books directly on the stenciled piece but thought it got lost in the background. I decided to add a circle piece of vellum first and then added the books with foam adhesive on top.
I completed the card by stamping a sentiment from the Stay Tuned stamp set onto a white cardstock banner and then adhered it directly to the card front.
For my second card I used the Love word stencil to create a fun design with a unique sentiment. I adhered the stencil to a white piece of cardstock and added ink to the stencil openings with Razzle Berry ink. I added the ink darker in some areas to give it an ombre look.

Once I had the word all inked up, I stamped my sentiment directly on it with black ink. I used the Smitten stamp set and stamped the 'Love You to' part on the L and then added the word 'Pieces' to the heart. I love that it looks like the stamped sentiment is part of the stencil design.

Since the card is single layer I decided to add some pink diecut hearts in a random pattern on the front for some added detail and dimension. I covered them with a clear glitter marker to make them shimmery.
To complete the card I added a black cardstock mat at the top and bottom of the stenciled piece and then adhered it to a white card base.
Make sure to head over to the MFT blog today for more great projects from the creative team for this months challenge. ;)
Supplies


So cute love the word play
ReplyDeleteSo cute love the word play
ReplyDelete