Showing posts with label Simon Says Stamp. Show all posts

Hello | SSS October Card Kit

Hello! I have one more card to share today that uses the October Simon Says Stamp card kit. For this card I really wanted to use the large heart stamp with the gold ink that comes in the kit and I love the end result! ;)

I stamped the large heart onto a piece of watercolour cardstock with Versafine Onyx Black ink and then I heat embossed it with clear embossing powder. This is my favourite way to emboss with black, rather than using black embossing powder which can be really messy.

Once I had it embossed, I put some of the gold ink that comes in the kit onto a craft mat and painted it onto the heart with a paint brush and water. The water helps to thin out the ink a bit and make it easier to 'paint' with.

Once the heart was dry I created a sentiment strip by stamping the word hello onto a black piece of cardstock and embossing it with white embossing powder. I trimmed it down and adhered it over the heart and added a butterfly from one of the journaling cards that came in the kit.

I added a strip of black and white striped patterned paper to the side of the card and finished it off with a scattering of gold sequins for some added detail and dimension.

To see how I created this video, you can watch the video below:


You can pick up the October card kit here for just $29.95 + shipping. Or if you’d like to receive this kit and future kits for only $24.95 + shipping per month, you can subscribe here. When you subscribe you will receive kits delivered to your door automatically!

Thanks for stopping by! Be back soon!

Supplies


SHARE THIS POST - {PINTEREST}

SSS October Card Kit + Crafty/Life Updates + Giveaway!

Hello! Today I have a card to share that features the newly released October card kit from Simon Says Stamp! This month's kit is full of pinks and golds and has an awesome stamp set and die as well! I had a lot of fun creating with it!

For my card I used one of the patterned papers and one of the journal cards to create a butterfly shaker card. As soon as I saw that butterfly journal card I knew it would look awesome with sequins and beads behind it.

I cut the journaling card down to give it straight corners rather than rounded and then I added a piece of vellum to the back of it for the shaker window. I then added foam adhesive all around the butterfly and filled the inside with clear and gold sequins and beads. 

I adhered the shaker piece to the gold heart patterned paper that I diecut with a stitched rectangle die and then matted the whole thing onto a piece of black cardstock.


I stamped the smaller sentiment onto a piece of black cardstock with Versamark ink and then heat embossed it with white embossing powder. I adhered it to the card over the butterfly and then also added the word Hello that I diecut from some gold glittery cardstock.

I completed the card by adhering the finished panel to a white top-folding card base and then adding a few clear sequins around the butterfly.

You can pick up the October card kit here for just $29.95 + shipping. Or if you’d like to receive this kit and future kits for only $24.95 + shipping per month, you can subscribe here. When you subscribe you will receive kits delivered to your door automatically!

Giveaway

I have an extra October card kit to give away! Just leave a comment on this post by September 20, 2015 for a chance to win! ;)

Crafty/Life Updates

I don't usually share too much on my blog aside from card/crafty posts lol! but I wanted to touch base on a couple of things:

This will be my last month sharing cards with the Simon Says Stamp card kit. I've decided that's its time to let a couple things go so I can focus on other things (see below) and this was one of those things. It's been fun creating with the kits for the past couple years but I felt it was time to move on. ;)

For those of you who follow me on Instagram, you know I've been renovating my kitchen. My husband and I have been doing a lot of it ourselves so it has been taking up a lot of my time lol! But I am loving seeing the progress as we move forward and now I pretty much want to renovate everything in the house. So proud of 'us' for all the hard work we've put into it! Thank you to all of you for sharing our renovation journey! ;)

I've been really focusing on getting healthy and taking care of myself. I make time for the elliptical on a regular basis and feel so energetic and happy when I push myself to get moving. I'll be having surgery in November and I really want to have my body in the best shape I can. 

I'm definitely still crafting, although sometimes I have less time to get creative... mainly because of the above haha!

So I apologize if I don't have crafty posts up as often. I'll be taking a bit of time off after my surgery (I'm going to try and have stuff scheduled and ready beforehand) but I have weeks of being home to recover that I'll hopefully feel up to creating. I'll definitely keep you posted!

Thanks as always for stopping by and spending part of your day with me!  I so appreciate it!

Supplies


SHARE THIS POST - {PINTEREST}

STAMPtember® Exclusive with My Favorite Things!

Hello! Today I have a couple of cards to share that I created with the new exclusive STAMPtember® stamp set designed by My Favorite Things for Simon Says Stamp!


I love great sentiment stamp sets (especially thank you themed!) so I was super excited to see this awesome new exclusive set. I love the mix of the painted font paired with the type font.

I decided to create two cards using only the Thanks for Being There stamp set, ink and some hearts and sequins. Sentiments are a great way to add a design to a card to create a graphic, clean and simple look! ;)


I kept both cards fairly simple and used only Sea Glass and Black ink on both of them. I added the type sentiments in different ways but kept the feel of the cards pretty similar. 

For the Thank You card, I stamped the 'I can always count on you' sentiment repeatedly in diagonal lines on the bottom area of the card. I then stamped the larger Thank You in black ink above the repeated stamping and added a black and pink strip of cardstock in between. I love the pop of colour the pink adds to the card.

I stamped the heart from the stamp set underneath the paper strips and added a clear sequin (with silver stickles in the center) to the side of the heart.

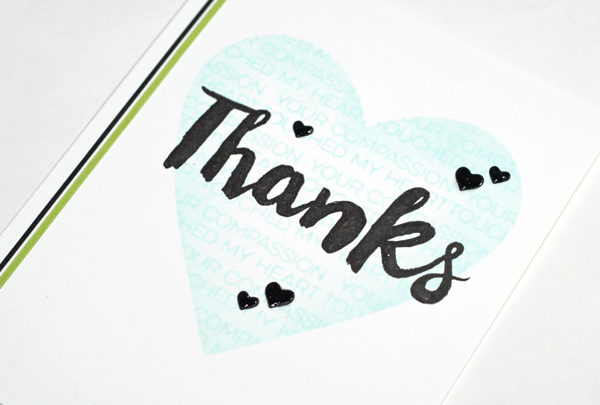
For my Thanks card, I created a heart shaped mask and then I repeatedly stamped the 'Your compassion touched my heart' sentiment inside the heart area. Once I had it fully stamped, I used an ink blending tool to pull in the same colour from the outer edges of the heart to the center to really define the heart shape.

Once I had the heart done I removed the mask and stamped the large thanks directly over top. I love how bold it is against the inked heart background.

To add a little more dimension and detail to the card, I diecut some hearts from black cardstock and adhered them to the card. I covered them with a clear wink of stella glitter marker and then with glossy accents.

To complete the card, I added a strip of black and green cardstock to the side of the stamped panel and then adhered it to a white top-folding card base.

I love stretching my sentiments sets to not only be the actual sentiment on the card but to also be a design element. Text looks so clean and graphic on a card, especially with a mix of type and script fonts.

Make sure to check out the Simon Says Stamp blog to find out more about this awesome collaboration and to see more fun ways to use this exclusive stamp set! ;)

Supplies


SHARE THIS POST - {PINTEREST}

Let's Celebrate | SSS September Card Kit

Hello! Today is the 14th which means the newest Simon Says Stamp card kit is available! Yay! The September kit is another really fun one with great products to stretch your creativity!

I decided to use one of the acetate cards from the kit and pair it with a patterned paper that has a similar pattern for the focal point on my card. I love how the peachy pink and the grey look together... such a soft, elegant look. ;)

I ran the acetate card through my Xyron sticker maker so that the back would be completely covered in adhesive (this helps make the adhesive less noticeable) and then I adhered it directly on top of the grey and white patterned paper that kind of has a similar pattern. I love how great they look together!

I stamped the sentiment on a leftover piece of the patterned paper I used and then cut it onto a banner to add to the card. I also cut a smaller one from the same paper but flipped it over so the aqua side was showing.

I adhered the finished piece to a Smoke cardstock mat and then I added it to a white, top-folding card base. I finished the card by adding some clear sequins and silver stickles.

You can pick up the September card kit here for just $29.95 + shipping. Or if you’d like to receive this kit and future kits for only $24.95 + shipping per month, you can subscribe here. When you subscribe you will receive kits delivered to your door automatically!

Giveaway
I have an extra September card kit to give away! Just leave a comment on this post by August 20, 2015 for a chance to win! ;)

Supplies


SHARE THIS POST - {PINTEREST}
 
SITE DESIGN BY DESIGNER BLOGS